
It started with a smell. When Lisa and Ramon moved into their new home, everything seemed perfect: fresh paint, new carpet, even a recently finished basement that added cozy living space. But by the second month, Lisa noticed a musty odor that seemed stronger after rain. Ramon dismissed it at first, chalking it up to the old couch they’d moved downstairs. But within weeks, the basement carpet felt damp, and spots began appearing on the baseboards. By the time they discovered the hidden issue behind the drywall, the mold and moisture problem had spread — and so had the cleanup costs.
The contractor who finished their basement didn’t install a vapor barrier or check for foundation moisture. Rainwater pooled against the house, slowly seeping in. The mold was hidden behind beautiful new drywall until it started to smell. Their homeowner’s insurance only covered a portion of the damage, because the issue was deemed preventable due to poor drainage. In the end, they paid more than $6,000 out-of-pocket for remediation and repairs.
What Causes Mold and Moisture Problems in a House?
Mold and moisture problems often start quietly. High humidity, water leaks, poor ventilation, and condensation are the most common culprits. Moisture can creep in through cracked foundations, leaky roofs, poorly sealed windows, or even daily activities like cooking and showering.
Once moisture is present, mold can grow on wood, drywall, carpet, and insulation — anything organic. And because many of these materials are hidden behind walls or under floors, damage can spread before you realize there’s a problem.
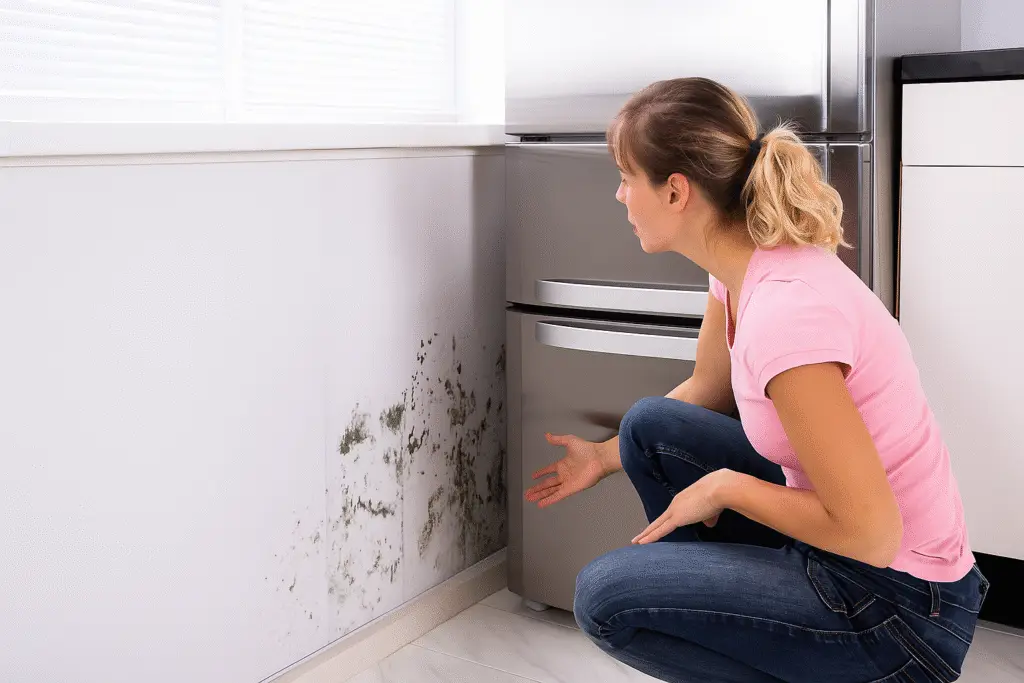
How to Spot the Signs Early

Be sure to check hidden spots like under carpets and pads, behind wallpaper or vinyl flooring, and inside cabinets or sink bases — anywhere that moisture can collect unnoticed.
If you’re unsure whether your home has a moisture problem, a few basic tools can help you find out. A moisture meter — available at most hardware stores — can test walls, floors, and baseboards for hidden dampness. Look for readings above 15% in wood or drywall as a warning sign. You can also use a hygrometer to measure indoor humidity levels; anything consistently above 60% can lead to mold growth.

Another valuable tool is a thermal imaging camera, which can detect temperature differences in building materials. These differences often indicate moisture hiding behind walls, under floors, or in ceilings. While some pros use high-end versions, more affordable consumer models are now available for smartphone use.
Visual inspection is just as important. Check for water staining, warped materials, or rust on metal components like nails or ductwork. And don’t forget your nose — a persistent musty smell is often the first red flag.
Is It Dangerous? What You Need to Know About Mold Exposure
Learn more about mold and health
Note: There is no safe type of mold indoors. All mold found growing inside your home should be treated as a potential health hazard and removed promptly.
Mold is a type of fungus that requires three things to grow: moderate temperatures, moisture, and organic material like wood or drywall. Because mold spores are always present in the air, they’ll settle and grow wherever those conditions are met — especially in hidden, damp areas.
Mold exposure can be a serious health risk, particularly for young children, seniors, and people with asthma or allergies. Common symptoms include coughing, sneezing, headaches, and skin irritation. Long-term exposure to certain mold types, like black mold (Stachybotrys), can be more dangerous.
If you see a patch of mold larger than 10 square feet, or if it keeps returning after cleaning, call a certified mold remediation professional. Mold testing is often not necessary — if you see or smell mold, you have a problem that needs to be addressed.
Why Mold Testing Isn’t Usually Necessary
Testing can be expensive and may not tell you anything you don’t already know. There are no widely accepted health-based standards for indoor mold levels, and different people react differently. It’s almost always more practical to fix the moisture problem and clean up the mold than to spend money on testing.
Even small patches of mold can produce allergens and irritants that pose a health risk — particularly for children, seniors, and people with weakened immune systems. For smaller surface issues, DIY cleanup is usually fine with the right precautions, but never ignore mold just because it looks harmless.
How to Fix Moisture Problems and Stop Mold From Coming Back
Acting fast after a leak is key. Start by fixing the source of the leak and then drying out the area within 24 to 48 hours using fans, dehumidifier s, and ventilation. Discard any soaked materials that can’t be fully dried. Even if a surface feels dry, test it with a moisture meter to be sure — hidden dampness is where mold often starts.
If the leak affected a large area or hard-to-reach spaces, you may want to call in a professional water damage restoration service like SERVPRO or ServiceMaster. These companies have the equipment and expertise to dry and treat spaces thoroughly and help prevent mold before it starts.
And if you’re unsure whether to notify your insurance provider , consider this: if there’s no visible damage or claim-worthy issue, reporting might not be necessary. But if you’re concerned about long-term effects, document everything with photos and consult your agent to be safe. Every policy is different, and early reporting may help if damage worsens later.
Stopping mold starts with stopping moisture:
- Seal leaks: Fix roof leaks, plumbing drips, and window seals.
- Ventilate: Use exhaust fans in kitchens and bathrooms. Add attic or crawlspace ventilation if needed.
- Dehumidify: Keep indoor humidity below 60%. In damp spaces like basements, a dehumidifier can make a big difference.
- Insulate cold spots: This helps prevent condensation on pipes, windows, and walls.
Step-by-Step Guide: How to Clean Up Mold Safely
Warning: Ozone-generating air purifiers are not recommended. Studies show they are ineffective against mold and may worsen indoor air quality by irritating lungs and airways.
In many cases, cleaning up mold can be a DIY project — but it’s important to protect yourself and others. If you’re dealing with more than a few square feet of mold, or if you have asthma, allergies, or a weakened immune system, it’s best to hire a professional. Here’s a safe and thorough process to follow:
- Protect Yourself
- Wear rubber gloves, safety goggles, an N95 respirator, and washable or disposable outer clothing.
- If you’re sensitive to mold or can’t wear a respirator, hire a mold remediation professional.
- Protect Others and Contain the Area
- Remove furnishings and items from the work area.
- Seal the area off from the rest of the home using plastic sheeting.
- Cover HVAC vents and use a box fan in a window to exhaust air outdoors.
- Dry Everything First
- Use fans, dehumidifiers, and ventilation to completely dry all surfaces before cleaning.
- Clean the Mold
- Use detergent and hot water, scrubbing with a stiff brush. For a homemade solution, mix 1 tablespoon of dish detergent with 1 quart of water — this works well for most non-porous surfaces.
- For added mold-fighting power, spray full-strength white vinegar on cleaned areas and let it sit for an hour before wiping dry.
- Avoid bleach unless you’re dealing with sewage or floodwater; if needed, dilute 1/4 to 1/2 cup bleach per 1 gallon of water. Never mix bleach with other cleaners, and ensure the area is well-ventilated during use.
- Dispose of Contaminated Materials
- Bag moldy carpet, drywall, and insulation before removing from the home.
- Wipe tools and surfaces afterward with clean water.
- Dry Again
- Make sure the cleaned area is completely dry before rebuilding or painting.
- Optional: Treat with Mold-Killing Primer
- Monitor for Regrowth
- Keep an eye on the area for signs of new mold or dampness. If mold reappears, readdress the moisture source and repeat cleaning steps.
If drywall is moldy but still structurally sound, you may be able to clean and treat it instead of replacing it. Scrub with detergent and water or a specialized cleaner, then follow up with vinegar to kill remaining spores. Once dry, apply a mold-resistant primer like Kilz or Zinsser before repainting.
If the damage is from sewage, overland flooding, or deeply saturated drywall, replace it entirely. And always dry the area completely before rebuilding or repainting.
However, if the drywall is soft, crumbling, or the mold has deeply penetrated, it’s best to cut out and replace the affected section. Always allow the surrounding area to dry completely before doing any patching or painting.
If mold is in HVAC ducts, insulation, or has soaked into drywall or subflooring, it’s time to call a pro. Professionals may use HEPA vacuums, antimicrobial treatments, or dry ice blasting depending on the severity and location of the mold.
Pro Tips & Watch-Outs
- Don’t paint over mold — it will return.
- Always use a moisture meter before finishing a basement.
- Set dehumidifiers to 50–60% and empty regularly.
Conclusion: Don’t Wait Until It Smells Bad
Mold and moisture problems can quietly eat away at your home’s structure, air quality, and value. The earlier you catch them, the easier (and cheaper) they are to fix. Take a walk around your home today with a fresh set of eyes — and a nose, periodically check roofing, gutters, attics, crawl spaces.
Need a hand? Download AHA’s free DIY Home Moisture & Mold Inspection Checklist to start protecting your home today.